



Collectors: Spot Real Bronze Patina in 10 Minutes, Home vs Pro Tests
Collectors: Spot Real Bronze Patina in 10 Minutes, Home vs Pro Tests
Genuine bronze patina forms inside the metal surface over years or centuries, so it shows depth, layered color, and firm adherence, especially in protected recesses. Applied or chemical patinas usually sit on top of the metal instead, and they read as flat, uniform, or paint like, with a tendency to flake or rub off under light pressure.
Check a shielded recess against a high point under raking light first. If you see loose powdery salts or a coating that lifts with a fingernail, stop cleaning and get a conservator’s opinion before doing anything else.
Key Features:
- Genuine bronze patina develops deep, layered color variations with a gradient from high points to recesses, unlike flat, uniform applied coatings.
- Active corrosion, such as powdery salts or flaking, indicates poor preservation or ongoing deterioration, requiring professional assessment.
- Typical corrosion minerals like malachite, azurite, and atacamite form under specific environmental conditions, with stabilizing tin oxide layers suggesting long-term stability.
- Visual checks should include comparing protected recesses with exposed surfaces and analyzing surface texture, color, and detail clarity for authenticity clues.
- Professional testing involves non-invasive methods like XRF, FTIR, and micro-sampling to confirm layered stratigraphy and mineral composition.
Table of Contents
- Bronze Patina Identification: A Quick Visual Checklist
- What Gives Bronze Patina Its Color? The Chemistry Behind the Surface
- How Do Conservators Actually Test Bronze Patina?
- Safe At-Home Tests for Checking a Bronze Surface
- Type I vs. Type II Patina: Reading Age and Stability
- Why Patina Matters for Authenticity and Value
- When to Call a Conservator: Red Flags That Need Expert Eyes
- How HD Asian Art Documents and Evaluates Patina
- Sources
Bronze Patina Identification: A Quick Visual Checklist
You don’t need a lab to catch most of the obvious tells. A strong flashlight, a 10x loupe, and ten careful minutes will settle a surprising number of questions before you ever call a conservator.
Start with light, not touch. Raking or specular light, meaning a beam held low and nearly parallel to the surface, throws shadows across every ridge, tool mark, and corrosion layer that flat overhead light hides completely. Move the beam slowly across the piece and watch how the color shifts. Genuine patina rarely looks like one color; it drifts from warm brown at the high points to deep green or black in the crevices, with soft transitions rather than hard edges.
Next, compare the parts that get touched, dusted, and rubbed against the parts that don’t. A base ring, the inside of an arm, the underside of a lotus throne, or the area behind drapery folds all stay shielded from handling and weather. Experts begin patina identification with exactly this kind of comparison, checking whether the protected zones show a deeper, more layered version of the same coloration seen elsewhere, according to the Getty’s technical guidelines for bronze sculpture. If the recesses look freshly stripped or oddly lighter than the exposed surface, someone has likely been cleaning or repatinating the piece.
Here’s what to scan for, in order:
- Depth and gradient. Real patina builds in translucent layers, so light seems to pass through several tones at once rather than sitting on a single flat color.
- Brush strokes or drip lines. Applied chemical patinas often leave faint directional streaking, especially near edges and undercuts, where a brush or sprayer left a trail.
- Uniform sheen. A patina that looks identical in color and texture across every surface, high point and recess alike, is a red flag. Age is never that consistent.
- Flaking or powdering. Any spot where the surface lifts, crumbles, or leaves colored residue on your finger is either active corrosion or a poorly bonded artificial coating.
- Crisp casting detail under the patina. Genuine age typically softens but doesn’t erase fine chasing and mold lines; a patina thick enough to blur every detail may be masking a rough or reworked surface.
A phone camera can substitute for a loupe if you don’t own one. Set the camera to macro mode, hold a small flashlight at a low angle just out of frame, and shoot the same square inch from a few angles. Zooming into the photos afterward often reveals brush texture or crystal structure invisible to the naked eye.
Pro Tip: Photograph the same spot in daylight, indoor light, and raking light before you touch the piece. Patina that looks convincingly aged under one light source sometimes reveals a flat, sprayed texture the moment you switch the angle.
None of these checks proves age on their own. Curatorial practice depends on reading several indicators together, color, weight, surface depth, and wear pattern, rather than betting everything on one clue. A piece that passes three or four of these checks is worth taking seriously. One that fails even a single test, like powdery residue in a recess, deserves a harder look before you consider it authentic.
What Gives Bronze Patina Its Color? The Chemistry Behind the Surface
The colors you see are corrosion products, and each one forms under specific conditions that leave a kind of chemical fingerprint. Knowing the basics turns a vague “it looks old” impression into something closer to an actual diagnosis.
Cuprite (Cu2O) is usually the first layer to form, a reddish brown compound that develops directly on the bronze surface as copper reacts with oxygen. It’s often invisible to the eye because later layers grow over it, but conservators look for it as the base of a healthy stratigraphy.
Malachite produces the bright to deep green most people picture when they think “bronze patina.” It forms as copper carbonate crystals, usually where moisture and carbon dioxide have had sustained contact with the surface, think garden statuary or objects exposed to humid air for decades.
Azurite gives a blue tone, chemically related to malachite but formed under slightly different moisture and carbonate conditions. It’s less common than malachite on outdoor bronze and often appears in smaller patches rather than covering broad areas.
Atacamite and paratacamite, both copper chloride minerals, are the ones to watch closely. They form when chlorides, from soil, sea air, or even old cleaning products, get into the metal. These minerals are associated with active, ongoing corrosion rather than a stable protective layer, and they’re often the underlying cause of what collectors call “bronze disease.”
Cassiterite (SnO2), tin oxide, tells a different story entirely. It shows up on tin-rich bronze alloys and forms a dense, compact, protective layer rather than a loose crust.
Environment shapes which of these dominates. Outdoor weathering under rain and sun tends to build the classic green to brown range through malachite and cuprite. Burial conditions, especially in wet or chloride-rich soil, push toward the atacamite family and can produce mottled, encrusted surfaces with pitting underneath. Deliberate artist or foundry patination, by contrast, tends to be faster, shallower, and more uniform, since it’s chemically induced over hours or days rather than grown over generations.
The tin connection matters more than most collectors realize. Research on ancient tin-rich bronzes shows that Type I corrosion layers often contain SnO2 nanocrystals that form a compact, adherent horizon on the metal surface. This SnO2-rich structure acts almost like a built-in protective skin, which is one reason certain archaeological bronzes survive centuries of burial with a stable, unbroken patina while others corrode into a pitted mess. Alloy composition, in other words, isn’t a footnote. It’s a primary reason two bronzes buried in similar soil can end up looking completely different.
Here’s a rough guide to what you’re likely seeing based on color and context:
- Warm brown to reddish surface, smooth and continuous: likely cuprite as a base layer, often under other minerals.
- Bright to deep green, sometimes powdery in patches: likely malachite, common on outdoor and long-handled pieces.
- Blue patches, usually localized: likely azurite, often alongside malachite.
- Pale green, waxy or crusty, especially with pitting: possible atacamite or paratacamite, a sign to check for active bronze disease.
- Dense, dark, tightly adherent gray to black layer on a tin-rich alloy: possible SnO2-rich Type I patina, often a marker of long-term stable burial.
None of this replaces lab testing, but it gives you a vocabulary for describing what you’re looking at, which matters the moment you decide to call in a specialist.
How Do Conservators Actually Test Bronze Patina?
Professional examination follows a sequence, starting cheap and non-invasive, escalating only when the visual evidence raises real questions. Understanding that sequence helps you know exactly where your own home inspection stops and where lab work has to take over.
The process typically starts exactly where your own checklist does: raking light, ultraviolet light, and magnification, but with the addition of systematic mapping. Conservators photograph and document color and texture zone by zone rather than relying on a general impression, which lets them track changes over time and compare a piece against known reference patinas. Getty’s technical guidelines for bronze sculpture outline this visual-first approach as the standard starting point before any instrumental analysis, precisely because it’s fast, free, and often decisive.
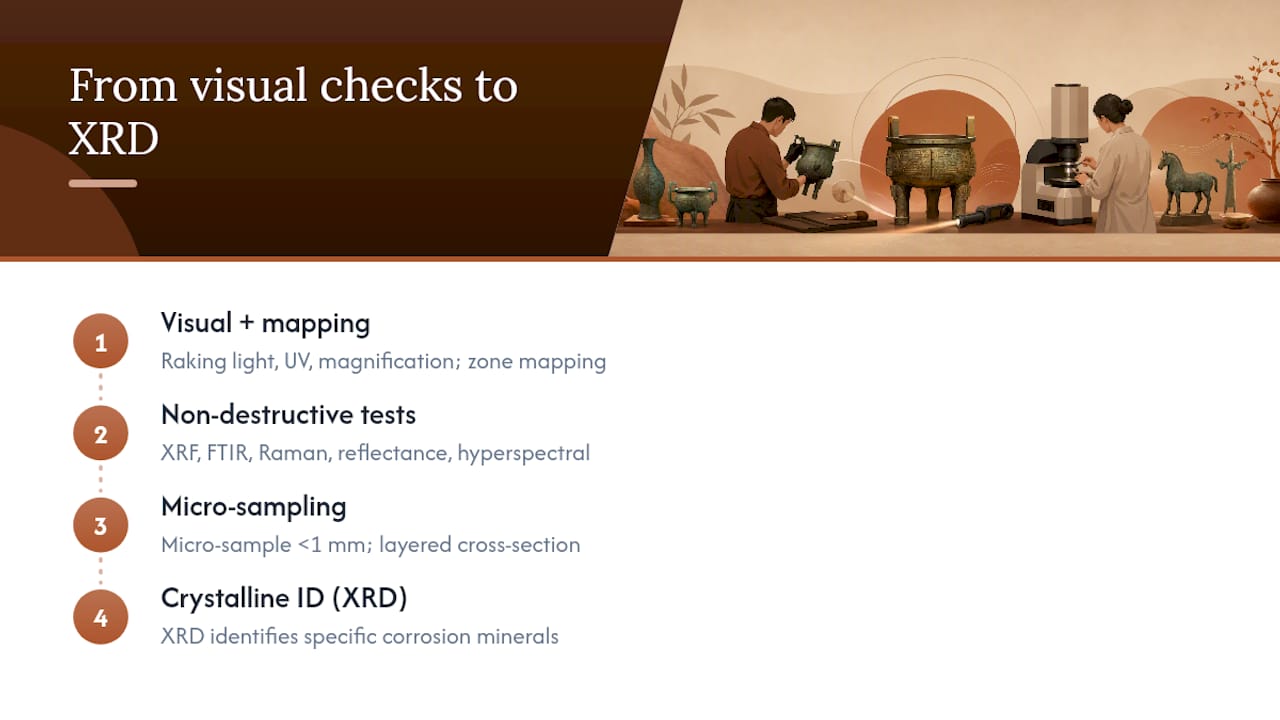
When visual examination raises a specific question, mineral composition, whether a coating is organic or inorganic, whether corrosion is active, non-destructive instruments come next. X-ray fluorescence (XRF) reads elemental composition without touching the surface, useful for confirming alloy content or detecting unexpected elements from a modern applied finish. FTIR and Raman spectroscopy identify molecular structures, which distinguishes mineral corrosion products from synthetic waxes, lacquers, or paints. Reflectance spectroscopy adds another layer of color data that the human eye can’t fully separate. Newer approaches, including hyperspectral image unmixing, are being used to decompose overlapping corrosion signatures that look identical to the naked eye but have distinct spectral fingerprints.
Only when those tools can’t resolve the question does a conservator move to sampling. Micro-sampling takes a tiny, targeted fragment, often less than a millimeter, for cross-sectioning under a microscope. This reveals the actual layered stratigraphy: cuprite near the metal, followed by carbonate or chloride minerals, followed by any modern coating on top. X-ray diffraction (XRD) then identifies the specific crystalline phases present, confirming whether you’re looking at malachite, atacamite, cassiterite, or something else entirely.
Every step is documented, and conservators work under a minimal intervention principle: take the smallest sample necessary, from the least visible location possible, and only when non-destructive methods have genuinely reached their limit. That restraint is worth remembering the next time you’re tempted to scrape a coin-sized patch off a statue “just to check.”
Safe At-Home Tests for Checking a Bronze Surface
A handful of low-risk checks will tell you far more than any internet forum guess, provided you resist the urge to reach for a chemical or a wire brush.
- Pick an inconspicuous spot for a scratch test. Choose a small, already-worn area, like the underside of a base, never a visible surface. Press a fingernail or the edge of a soft wooden toothpick gently against the patina. A genuine, integrated patina resists and doesn’t flake into powder. An applied coating often lifts in a thin flake or leaves a colored smear on the tool.
- Skip the vinegar. Household acids, lemon juice, and commercial metal cleaners can react with the very corrosion minerals you’re trying to evaluate, dissolving cuprite or malachite and permanently altering the surface you were about to judge. Once that reaction happens, you’ve destroyed the evidence, not revealed it.
- Weigh it in your hand and feel the temperature. Solid cast bronze has real heft, and it feels cool to the touch even in a warm room, since metal conducts heat away from your skin faster than resin or painted composite. A piece that feels suspiciously light, or warms quickly against your palm, may not be bronze at all.
- Compare protected recesses against exposed high points. Return to the same shielded areas from your visual checklist, the base, the underside of a limb, behind drapery, and check whether the coloration there looks like a natural continuation of what’s on the exposed surface or like a completely different material.
- Bring in the loupe and raking light one more time, slower. A second pass, once you’ve handled the object and know its weight and feel, often reveals details you missed the first time, particularly along tool marks and seams where casting details survive best.
If any of these checks turn up loose powdery deposits, especially a pale green or white crust that transfers onto your fingers, treat that as an active corrosion signal rather than a cosmetic issue. That pattern often points toward chloride-driven bronze disease, and scrubbing or sealing it without treatment tends to trap the problem under the surface rather than solving it. Our guide to halting bronze disease walks through what a conservator does at that stage, and it’s worth reading before you attempt anything beyond gentle dusting.
Pro Tip: If you’re unsure whether a scratch test spot will show, practice the pressure on a modern bronze object you don’t care about first. That way you’ll recognize what “gentle enough” actually feels like before you try it on something old.
Type I vs. Type II Patina: Reading Age and Stability
The distinction between Type I and Type II patina, a framework developed through bronze corrosion research, tells you more about a piece’s condition than almost any other single observation. Type I patinas are compact, layered, and chemically stable. Type II patinas are disrupted, chloride-heavy, and actively deteriorating.
Type I forms through a slow, even process where corrosion layers build in sequence: cuprite closest to the metal, followed by more stable copper minerals, and on tin-rich alloys, a distinct SnO2-rich horizon. Bronze corrosion research on ancient tin-rich alloys confirms that this cassiterite layer forms a compact, protective structure that essentially seals the metal beneath it from further attack. Visually, Type I patina tends to look smooth, tightly adherent, and consistent in texture even where colors shift from brown to green to black. It’s the kind of surface that has clearly had decades or centuries to settle into equilibrium with its environment.
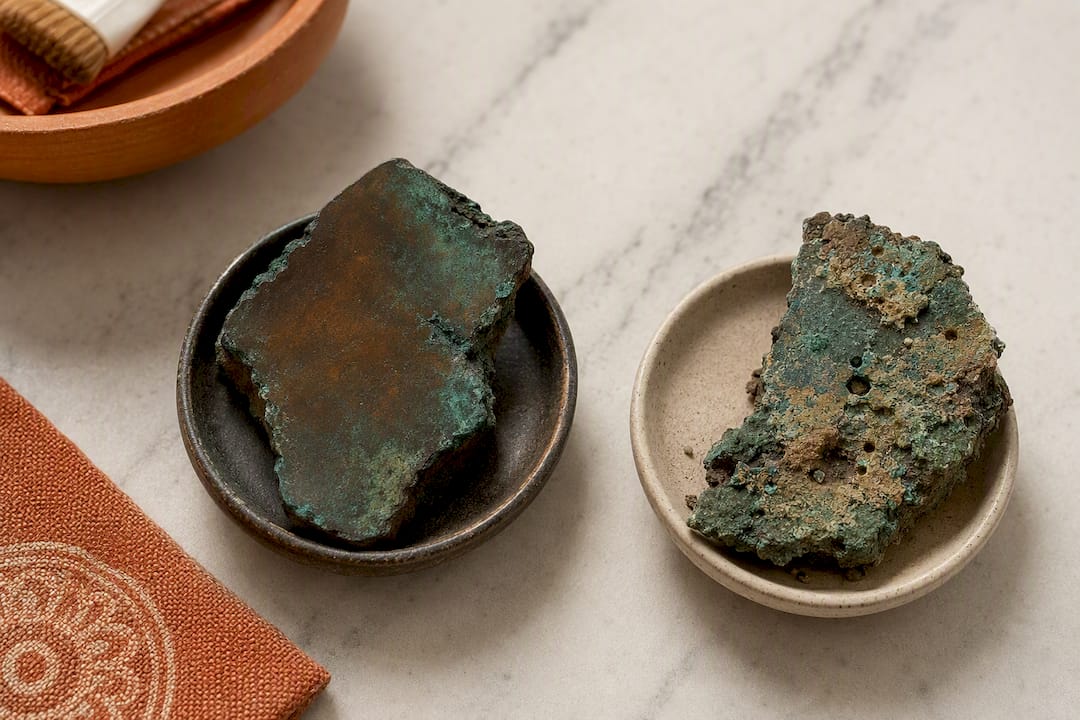
Type II tells the opposite story. Rather than an orderly sequence of layers, the corrosion is disrupted, often by fluctuating moisture, soil chemistry rich in chlorides, or repeated wetting and drying cycles typical of burial near coastlines or in disturbed ground. The resulting surface is friable, meaning it crumbles or flakes rather than holding together, and it frequently shows pitting where corrosion has eaten unevenly into the metal. Where Type I looks settled, Type II looks restless, patchy, uneven in texture, and often paler or more powdery in the active zones.
Here’s how the two typically present side by side:
- Surface cohesion. Type I holds together as a firm, continuous layer. Type II crumbles, flakes, or powders under light pressure.
- Color consistency. Type I shows smooth gradients between related tones. Type II often shows abrupt, patchy discoloration, especially pale green or whitish crusts against darker undisturbed areas.
- Pitting. Type I surfaces are generally smooth beneath the patina. Type II frequently reveals small pits or voids where corrosion has actively consumed metal.
- Underlying implication. Type I generally points to long-term stable conditions, whether decades of indoor display or centuries of undisturbed burial. Type II signals ongoing, active corrosion that will likely continue without intervention.
The practical takeaway for a collector is straightforward, even if the chemistry behind it isn’t. A Type I patina is generally something to preserve exactly as it is, since it represents both genuine age and a stable protective barrier. A Type II patina is a problem in progress, not a finished condition, and it usually needs conservation attention rather than admiration. Mistaking one for the other, treating an actively corroding surface as a charming sign of age, is one of the more expensive errors a new collector can make.
Why Patina Matters for Authenticity and Value
Original patina is evidence, not just decoration. It preserves the fine chasing, tool marks, and sometimes the foundry or workshop marks that specialists use to attribute a piece to a particular region, period, or maker. Once that surface is stripped or reapplied, that evidence is largely gone, and no amount of expert opinion can fully reconstruct what was underneath.
Combined indicators build the strongest case for authenticity. Appraisers look at patina alongside weight, temperature, and the sharpness of casting detail, since a modern reproduction dressed up with a quick chemical patina rarely gets all of those elements right simultaneously. A piece that feels appropriately heavy, stays cool to the touch, shows crisp chasing under the patina, and carries a patina with real depth and layered color is far more convincing than any single trait on its own.
Manipulation tends to leave its own traces, once you know to look for them. Repatination, applying new chemical color over a cleaned surface, often looks slightly too even and can sit awkwardly against original tool marks, blurring detail that should still read sharply underneath a genuine layer. Applied pigments, sometimes used to fake a convincing green or brown tone quickly, tend to sit on top of the metal rather than integrating with it, and they frequently show under UV light as a different fluorescence than surrounding areas. Hidden modern fixings, screws, brackets, or repair pins disguised under fresh patina, are a common trick on composite or repaired pieces and are usually detectable with a magnet test or a careful look at joins and seams.
The most damaging mistake, though, is usually well intentioned. A collector scrubs a “dirty-looking” bronze to make it presentable, not realizing that the dark, uneven surface they just polished away was the original patina carrying decades or centuries of provenance. Once that layer is gone, the piece’s story goes with it, and its market value typically drops along with it. Our guide to spotting and correcting an over-cleaned surface covers this exact scenario and what, if anything, can be done afterward. If you’re trying to pin down origin and maker marks specifically, our authentication guide for antique bronze Buddha statues goes deeper into foundry marks and stylistic dating.
When to Call a Conservator: Red Flags That Need Expert Eyes
Some signs genuinely require professional judgment rather than another round of home inspection. Waiting too long on these can turn a manageable issue into permanent damage.
Watch for these red flags specifically:
- Active powdery salts, particularly pale green or whitish crusts that transfer onto your fingers or reappear after cleaning, a classic sign of chloride-driven bronze disease in progress.
- Flaking or lifting layers anywhere on the surface, whether that’s the patina itself or a coating on top of it.
- Severe pitting visible once you look closely with a loupe, especially clusters of small voids rather than a single scratch or dent.
- Sudden color change, a patch that looks noticeably different in tone or texture from the surrounding surface, especially if it appeared recently or after storage in a new location.
Before you contact anyone, put together a simple documentation packet. Take clear photographs in natural light, raking light, and if possible under UV, covering the whole piece plus close-ups of any concerning areas. Note where and how the piece has been stored or displayed, whether it’s spent time outdoors, near a coastline, in a damp basement, or in a climate-controlled room, since environmental history often explains a lot about what a conservator finds. Gather any provenance documents, prior appraisals, or purchase records you have, even informal ones.
A conservator’s initial assessment usually starts with the same visual and magnification review you’ve already done, followed by targeted non-destructive testing if the situation calls for it. Full analysis, sampling, and treatment recommendations can take anywhere from a few days for a straightforward case to several weeks if lab testing is involved. That timeline is worth knowing upfront so you’re not caught off guard waiting on results.
How HD Asian Art Documents and Evaluates Patina
Every bronze piece offered by reputable galleries is often photographed under multiple lighting conditions, including raking light across high points and protected recesses, because that comparison is often the fastest way to confirm a patina reads as integrated rather than applied. Listings often include plain descriptions of color transitions, surface texture, any areas of wear or repair, rather than leaving buyers to guess from a single glamour shot.
A conservative approach to cleaning is often preferred, leaving an honest, slightly uneven patina intact rather than risking stripping evidence that took generations to form. When a piece raises real questions, such as unusual coloration or uncertain attribution, outside lab work is typically commissioned rather than relying on internal guesses.
If you’re evaluating a piece from a collection or elsewhere, it helps to request close-up photos of protected recesses and raking-light shots of any area you can’t inspect in person. Sellers unable or unwilling to provide such images may be withholding information. You can see this documentation approach in practice on individual listings across our gallery, where condition notes accompany every piece we offer.
— James, HDAsianArt.com
Sources
For deeper technical grounding, the Getty’s guidelines for the technical examination of bronze sculpture remain the standard reference for visual and analytical protocols. The npj Heritage Science study on tin-rich bronze corrosion offers current mineralogical detail on Type I patina formation. Collectors focused on ongoing care should also read our guide to caring for antique bronze statues and our background piece on how bronze casting worked in ancient Asia, both useful companions to any patina assessment.
- Guidelines for the Technical Examination of Bronze Sculpture | Patina — Getty Publications
- A mechanism study of type I corrosion on the surface of ancient tin rich bronzes — npj Heritage Science
- Antiqueidentifier
- Velvetmatter
